Demise of a lens

The day after being re-united with my 50mm f/1.8 prime lens, I managed to break it into two pieces by accidentally smashing it into a wrought iron railing. Because of the Toronto snowfall, I was carrying my camera in ziploc bag. Due to the careless movement of my arm, a lens that I have used for years met what may be an untimely end.

I will investigate whether it is possible to have the two halves re-joined. If not, I will have to consider whether it is more sensible to replace the f/1.8 lens or buy the more expensive but more solidly constructed f/1.4 variant.

[Update: 29 January 2009] The word is back from the camera repair people. They estimate the chances of repairing the lens for less than the cost of a new lens at approximately zero. Also, it would take six to eight weeks. Eventually, I suppose I will buy a new 50mm lens.

Building a 35mm camera system

Just for the sake of cataloguing, I made a mind map of a comprehensive small-format camera system. Components in black are things I already have. Those in blue are things that I either eventually want more of, or eventually want better versions of. Things in red, I don’t have at all. Some of the items listed are general (‘lens hoods’) while others are specific, like a particular studio flash unit. Almost certainly, I have overlooked some things.

Clearly, there is a lot of expensive stuff you can use in combination with an SLR or dSLR body, and this listing doesn’t even include chemical or digital darkroom supplies. For those who aren’t wealthy, assembling a good fraction of this stuff is a multi-decadal project.

See also: Lens selection survey

Plea for photo gear

Anybody who can lend me the following piece of gear for the weekend will instantly earn a great deal of appreciation: a PC to Flash Hotshoe Adapter. That is to say, a device that can take the signal to fire a flash from a PC cable and feed it into the hotshoe of a flash.

I need it to connect a radio trigger to a 430EX flash. I ordered one online (since they are 1/3 the cost of buying one at Henry’s), but it won’t arrive until after I get back from Toronto on Monday.

Studio experimentation I

The photography class I was hoping to take at the Ottawa School of Art got canceled, due to lack of enrollments. Probably, that has a fair bit to do with the ongoing transit strike.

Nevermind. I can learn photographic lighting without the benefit of a class. I shot these on my dining room table. I used some tracing paper and my ironing board to set up a crude seamless backdrop (something more opaque would be better). For illumination, I used a hotshoe mounted flash. For light modification, I used a big round reflector: white on one side, soft gold on the other.

Because I have neither a wireless cable release (what a bizarre anachronism that term is!) nor an assistant, my basic approach was to turn the dining room lights on, focus manually, turn the lights out, point and set the flash, push the shutter (on two second delay), then dash into the right spot while holding my reflector.

These are all the original files, straight from the camera with no Photoshop tomfoolery.

Dutch auctions for selling photography

Contemplating the economics of selling photographs in coffee shops and small galleries, I had an idea about how such a sale might be conducted. Selling by means of a Dutch auction could be an effective approach: combining a mechanism to encourage a reasonable return for the photographer with a mechanism allowing buyers to express their preferences through their response to falling prices.

It would work like this:

  • The total cost associated with producing each print would be tallied, inclusive of printing, framing, etc.
  • The display period for the prints would be broken down into a number of periods: say, three.
  • During the first period, prices would be the highest. If, for instance, a print costs $20 and a frame costs $25, the price during the first third might be $90 (cost +100%).
  • During the second period, the profit margin would be reduced – perhaps to cost +2/3 ($75).
  • During the third period, the profit margin would be further reduced – perhaps to cost +1/3 ($60).
  • The periods and costs would all be announced at the outset, and displayed along with the prints.

What the system does for buyers is balances the advantage of waiting for a lower price against the risk that someone will buy at the current price. People will be encouraged to buy on the first day when the print is available at whatever price they consider acceptable. For the seller, the system decreases the risk of losing money on the exhibition. The falling prices make it more likely that most images will be sold, and the high initial profit margins make it more likely that the costs of any unsold prints will be covered by the profits on those that are sold.

Of course, this approach doesn’t consider all the costs associated with the photography. When one factors in equipment costs and the photographer’s time, higher prices (via thicker profit margins) may be justified. That being said, a lot of the photography that gets sold in coffee shops would probably have been taken anyhow, even if the photographer never expected to sell it. As such, the objective of breaking even on the prints themselves and perhaps earning a bit for future equipment purchases might be a realistic one.

Photography as hobby or career

Over on photo.net there is a good discussion of whether photography is a good way to make a living. The overwhelming response seems to be that it is an excellent hobby, but a very problematic career. It makes more sense to have a job to pay the bills; finance life, family, and photography; and allow you to treat the production of images as an artistic rather than a financial undertaking.

That coincides pretty neatly with my own intuitions about the matter. A few minutes on photo.net will turn up hundreds of top-notch photos. If the people making them are mostly warning of the difficulties of photography as a profession, it seems likely to be good advice.

Colour temperature and photography

Eye exams on Somerset

One way in which colours are categorized is according to the temperatures at which materials emit them, when heated in a vacuum. The phenomenon of warm things emitting light can be observed readily: for instance, when a bar of iron is heated from red, to orange, to yellow, to white. Some of the key colours photographically are those akin to the light of the sun around noon (about 5500° Kelvin) and the light from incandescent bulbs (about 3300° K). Just as with the heated iron bar, the hotter the light source, the ‘cooler’ the temperature appears: ranging from reds and oranges at low temperatures up to greens and blues. This can be a bit confusing, since the colours artists describe as ‘warm’ are actually produced by low temperatures, and vice versa.

Virtually all digital cameras have the ability to adapt to different colour temperatures. This is important because our eyes generally make the correction automatically. Looking at a scene under fluorescent lights, it doesn’t seem as green to us as it really is – and will appear on film or an uncalibrated digital sensor. Exactly how you set the white balance on your camera varies by model and manufacturer, but it is worth checking the manual over.

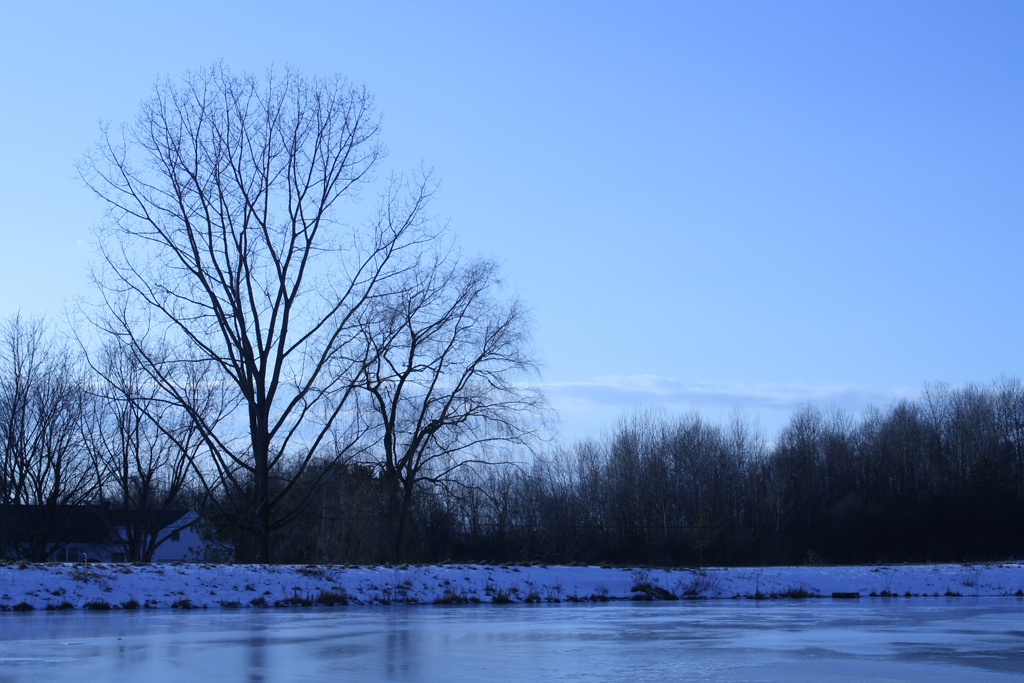
In addition to being used to correct for the dominant type of lighting in a scene, colour balance can be set so as to create a desired look that may not have been present in the original scene. For example, intentionally using the white balance for warm light (low temperature) in a scene with cool light (high temperature) exaggerates the cool light in the scene. As a result, you get a very cool looking photo like this one. By contrast, intentionally using the white balance for cool light (high temperature) in a scene that already has fairly warm light will exaggerate the warm light, as with this photo.

For users of Canon cameras, here is an easy way to try this out:

  • First, head out on a cold winter’s day and find a wintery looking scene.
  • Then, go into the white balance setting for your camera. If you have a point and shoot camera, this is normally done by setting the control dial on your camera to ‘P,’ then pressing the ‘Func. Set’ button in the middle of the wheel on the back. Scroll down once and you should be in the white balance menu. Press the ‘right’ button until you have ‘Tungsten’ selected.
  • If you have a digital SLR, there is usually a dedicated white balance button on the back, labelled ‘WB.’
  • Shoot the winter scene with that setting, and you will get a cool blue looking result.
  • Secondly, try shooting a warmish scene (such as one taken around sunset outside) with the camera set to ‘Cloudy.’ That will make it look even warmer, which is sometimes attractive.

When you choose a colour balance setting on your digital camera, you are telling it how to process the raw data from the sensor into a JPG image. Since the raw data isn’t normally retained, this is an irreversible choice (though it is possible to approximate a white balance change using software like Photoshop). For cameras capable of recording the data from the sensor as a RAW file, you will be able to select whatever white balance you like after the photo has been taken. Thanks to CHDK, a great many Canon cameras (including inexpensive point and shoot models) can be given this capability.

Incidentally, the matter of what wavelength of light is emitted by objects of different temperatures is a key part of the physics of climate change. One neat thing about science is the way you often run into aspects of one field that are relevant somewhere very different.

Location data and photography

Dylan and Dusty

Before long, I expect that many cameras will have built-in GPS receivers and the option to automatically tag every photo with the geographic coordinates of the place where it was taken. That will allow for some neat new kinds of displays: from personal photo maps that show the results of a single person’s travels to composites of the photos a great many people have taken of the same place.

For those who would be interested in such things, but don’t yet have equipment that can locate itself, it seems like there could be a simple workaround. These days, low-cost GPS tracking devices are very affordable. All you need is a camera and a tracker with coordinated clocks. Then, you carry the tracker with you when you take photos. After you upload them to a computer, you can run software to automatically attach location data from the tracking system to the photos. Given the increasing number of cell phones with GPS capability, they might be the ideal devices to provide such locational data. You could even configure one to automatically upload a track of your movements to a web service which would then match up that information with photos you upload later.

One snag would be photos taken in areas where GPS doesn’t work, such as on the subway. To deal with that, users could be presented with a few choices. The coordinates from the closest point in time where data is available could be used, a very general coordinate for the city or region in question could be substituted, or such photos could simply be left untagged.

No doubt, people could dream up some very clever ways of using this kind of data, especially once a lot of it was online. You could, for instance, produce collages of how a particular area looked over time. A mountain valley could be presented from the perspectives of everyone from those hosting afternoon picnics to those undertaking technical climbs of the peaks, with spring and summer photos contrasted against snowy winter shots. Groups of friends could also watch their trails of photos diverge and overlap, as they move around the world.

All told, it could be a very interesting experiment in communal memory.

Learning about photographic flashes

Want to learn how to use an external flash with your SLR camera system? Strobist has an useful ‘Lighting 101‘ series of articles. I have also had Light: Science and Magic by Steven Biver et al. strongly recommended to me.

Since I will be getting my hands on a 430EX II flash on Wednesday, doing a bit of pre-reading seemed sensible. The first photos I produce using it should appear here sometime after I return to Ottawa on the 28th.

Strangers and street photography

I have never been fond of photographing strangers, and my natural reticence has been enhanced as a result of a few people who responded badly. As a consequence, my photos generally include either friends, people who aren’t prominent in the image, or nobody at all. I make a bit of an exception for situations where people are clearly making a display of themselves (in costume, for instance), but generally avoid pointing my lenses at people I don’t know, even in public.

While I recognize the sense of this approach, it does make me feel as though my photos lack something that most street photographers manage to capture: specifically, the various moments that make up city life. Should I try to be bolder and produce some images like those in the photo.net ‘Street Photography’ tutorial?